menu button home menu button about me menu button shop menu button contact menu button buttons menu buttons advertise menu button freebies menu button tutorials menu button helping hand

Pages

A Crocheting, Knitting, Sewing, Scrapbooking, Crafty, Digi Scrap, Deals,Organizational, Recipe, Crazy Thoughts, Insight into my Chaos, Mommy Blog
Showing posts with label Organization Station. Show all posts

Monday, June 27, 2011

We're Going Digital-Honey Do List

Hold on to your hats people we are Going Digital!!!

I thought it would be fun to share one of my digital creations, just because!

If you're anything like me, (crazy) and you run your house anything like I do, (organized chaos) then you have lists and calendars every where and for everyone. My husband sadly is not an exception to my lists. In fact truth be told he gets hit pretty hard.

He's a trooper however and though he rarely hits 100%, he does pretty well. Solid B I'd say!

Weekly I write him up a list... a Honey-Dew List, (nice play on words) and let him know what I errands, chores...I need him to take care of. I have been utilizing one of my many, many notebooks but recently I decided to play in the digital world. I created myself a dry erase, reusable Honey-Dew list in an effort to be more green or just because I have a weird obsession with my lamination machine & dry erase markers (a little from column A, a little from column B...)

Link
The plan? To hang this bad boy right up on the fridge (see it's clever because I know that he'll quite often go to the fridge).

I've linked this so that you can download it for yourself if you want, otherwise you can find it in my "freebies." Just print the size you want, laminate and BAM! you're ready to pull out those dry erase markers and get to listing!

Fair warning though Dry Erase at your own risk-I can not be held responsible for you getting carried away and this list becoming a mile long. Use discretion ladies!


And, because I'm feeling CRAZY today I'm also going to throw in my matching grocery shopping list!
I do the same here, print, laminate, fridge it, and dry erase mark that sucker up!

Hope you guys enjoy!

Happy Dry Erasing!!

blogger signature

Tuesday, April 26, 2011

Organization Station-The Plan (Phase 1)-Living Room Update

Wow okay so it's been over a month now that I started my Living Room Re-Organization otherwise known as "THE PLAN",
and took my Living Room Chaos from this
to this...
(Do you hear the angels singing?)

First off let me say that I am one happy lady these days!!!

I was able with relatively little cost and fairly simple solutions to transform this room from a chaotic mess to a more functional, organized space (which we all know that I LOVE).

Here's the low down on my attack of this room.

1. First off, we started with a de-clutter of the room. We took out all the unnecessary items that really served no function for the room anymore (i.e. general mess, baby swing, baby bouncer, storage bins, treadmill...). This was great and it freed up a lot of space to play with and took the space from this...
to this...
(I know we just saw it but I LOVE seeing it again and again)

2. In our next move, we did a shuffle of the layout of the room. It was too random and hodge podge so we rearranged the key pieces in the room to create more functional zones which serve the flow and functionality of the room much better (i.e, moved the piano, desk, baby gear...).
So this area from before
was streamlined to become our entertainment zone here
This general cluttered mess
then became this baby zone/organized clean space
(It even came complete with a baby in the baby zone)
We took this mess of a space...
(Remember my craft/office space?)

and this untapped plethora of space
freed it up to become this
and transformed it to become our new office/craft zone here
We already had a two of these storage drawer sets, but purchased one more and they are now the new happy home to all my crafting and office supplies. I LOVE this space! It's quaint, but cozy. I'm still in the midst of everything but I'm somewhat separated to my own little crafty corner. I've got my clipboards to keep me organized, as well as my hanging organizer above the desk. I've got hooks to hold all my sewing projects (yea you read that one right), right now they've got the aprons from the store, and I've got a place to hold my crochet projects in process/manikin heads.
Ground has finally broken on my dream organization unit (Hallelujah)
(I'm told that the pieces are cut and ready for assembly...I'm exstatic and anxious to say the least).

Really the only thing this space is missing for me (besides the dream unit) is some pizazz! I need a little color, a little decor or something to keep me happy in my little corner, oh and a clock! I'm got some ideas in the works for a few projects, so be on the look out for those.

Our last zone took this hot mess
and turned it into this new Family Business Zone
(Ignore the Easter baskets, and folded laundry...)
I moved that piano solo mio! Seriously! No wheels...I'm not kidding! I'm like an ant.
I like the piano over here now it gives me space for all that family business. So we've got our family calendar, family rules, FHE board, and behavior chart all in one glorious spot!

3. Our third move was to bring in some additional pieces to bring in organization and functionality to the room (here's where some cost comes into play).

We made a trip to our storage unit and pulled out one of our end tables, so not only is our coffee table happy to be reunited with its little buddy but we are also happy to have more storage and an extra place to set our glass when we're watching TV.
We also decided to bring in this storage bench (which I've been coveting at Target) which allowed me to hide all the winter gear (because the beanies, you know there are a lot were literally taking over the house) and baby toys in one inconspicuous, functional, spot. My favorite part is that the bins nicely hide the chaos inside of them and no one will ever have to see it! The cushioned bench on top besides adding additional seating in our limited space, has also become a nice little spot for shoe tying.
This piece was really only one of three pieces that we purchased for this room, and at $60.00 (well worth it) was our most expensive purchase. I LOVE it, although I'm thinking I see a future project in the form of a cushion revamp coming soon.

Our other purchase and the sole reason for this update post taking SO long (the piece was lost in transport for a while), was this coat rack, also a Target find.
I wanted a coat rack because our apartment while having awesome storage space lacks a coat closet. Being a winter fearing family of 6 coat wearing people, coat storage was in need. In our old system
We had a make shift coat rack a.k.a. treadmill, but I thought it was time for an upgrade. I actually searched for a while to find a coat rack at a decent price that had hangers not only at the top but also down at the kids level. A fairly simple request, yet one that I found to be an expensive feature to ask for. Luckily for the hubster (who I was going to recruit for a custom job) good old Target came through for me again (it always does, I'm not sure why I bother looking any where else). This little baby ended up setting us back $42.00 with tax and shipping...not bad...not bad at all.

4. Our last move was to bring in a few decoration pieces just to give it a little more of a homey touch. I didn't go all out or bring in too much, believe me I wanted to and I always have in any apartment we've lived in, but I didn't want to this time just because I'm crossing my fingers that we'll be in our new place (wherever that might be) SOON! We did a little, mostly brought in some Spring/Easter Decor. The few pieces we brought in really made the place feel more homey, but also brightened up the space by breaking up all the drab color that was going on.


So one last time here's the before
and here's the after!
All in all I've got to say that I'm super happy so far with the result! Our space is limited, and it's tight quarters, but with a few simple and relatively low cost solutions we managed to make the space a more functional space! But let's not forget the most important thing...it's so much better organized and if we've learned nothing else, we've learned this Mamma loves her some organization!

With everything having a place to go, the room stays a lot cleaner, (which is always good) and pick up is a lot smoother, and best of all, I finally feel free from all the clutter! I'm working so much better these days!!!

Total cost for this living room revamp =$122...One Happy Mama=Priceless!!!


Photobucket

Monday, April 18, 2011

We're Going Digital-Family Rules

Okay Folks WE ARE GOING DIGITAL...Finally!
Don't be alarmed....I just mean that this post is digitally related!

Check out my latest Digital Project!

Are all of you engulfed in the Digital Scrapbooking craze?
I have to admit that I'm a little bit of a latecomer to this phase...I'm a traditional scrapbooker at heart and I have to confess that I was intimidated by the digital aspect of it all.
I am not by any means a computer whiz and I also like to be able to touch and smell what I'm working on (is that weird? It's the smell part that was weird huh?) So "going digital" was a little hard for me to wrap my head around.
I did finally give in though when I came across some pretty cool projects that I wanted to make my own so I talked the hubby into buying me the software (I can be very persuasive and the hubby is a major pushover!)

It took a little getting used to and a few tutorials to figure out what I was doing, but I LOVE it! I haven't done any real major scrapbooking as of yet, but I've used my digi scrap software a ton to create many different projects around our house! It is fantastic!

My latest project the Family Rules is just one of those projects that can be found in our house.
It seemed to be the case as of late that the "rules" had been forgotten and chaos was ruling all!
The hubs and I finally had enough.

We often like to gear our Family Home Evenings at the beginning of the month toward a value or lesson we feel our home needs. Often those revolve around issues we feel the kids need to learn or be reminded of. In this case we decided to gear it toward Family which encompassed respect, the family unit and each members role to making a happy home...honoring their Mother and Father and all that good stuff.

As part of the lesson we went over Our Family Rules and what each one meant, as well as the consequences and rewards that went with them. To make it easy I made a Family Rules visual aid, had it printed and laminated and displayed where the kids can see it and I can remind them often what those rules and expectations are.
It's actually been quite helpful for me to point to the rules (which is conveniently located next to their behavior chart and timeout spot) and remind them of those rules when they get a little too mischievous.
They actually like to remind each other of those rules quite often. Usually one likes to remind the other as they are breaking a rule, and usually that reminding comes loud and when mommy is in earshot....(Kids will be kids I guess).

Any who, I like to share so I thought I would!
You should, if I haven't totally messed this up, (which would be surprising) be able to click on the Family Rules Picture, download, print and laminate your own copy!

These are Rules that pertained to our house, but yours may be different, so it may not work for your home (If I could I would customize each of you one of your very own...but that might be crazy). Number 5 is my favorite one (of course) and number 9 I wish didn't have to be a rule but seems to be an issue in our house sometimes (besides potty training issues, my boys seem to think that outside is nature's bathroom). But if it does work for you download away baby!!

blogger signature

Thursday, March 24, 2011

Organization Station-(Phase 1)-Living Room-Clipboard Redo


Fancy Clipboards huh?? Do you like them? Do you want to make some of your own?

Then today is your lucky day because I will show you how!
Yay!!
(I'll give you a moment to catch your breath)...

These ultra fancy clipboards (Dollar Store Special) are playing a small role in Phase I of my "Orgnization Station: Living Room/Office Revamp for my Sanity!" (I'm thinking that's finally the name I've landed on for this Adventure) If you've been following me on my Organizational Adventures then you know what I'm talking about...if not then go here to catch up on all the happenings and be in the "know."

So, if you remember I have dreams...BIG dreams of my office space someday revolving around this beauty.

The hubs has agreed to build it for me, (It's in writing now and out there in the blog world so he's locked in...that was no accident on my part). The hubs works weird and crazy hours and doesn't always have a lot of "spare time," so I have yet to lock in a date for when I'll be seeing this bad boy!

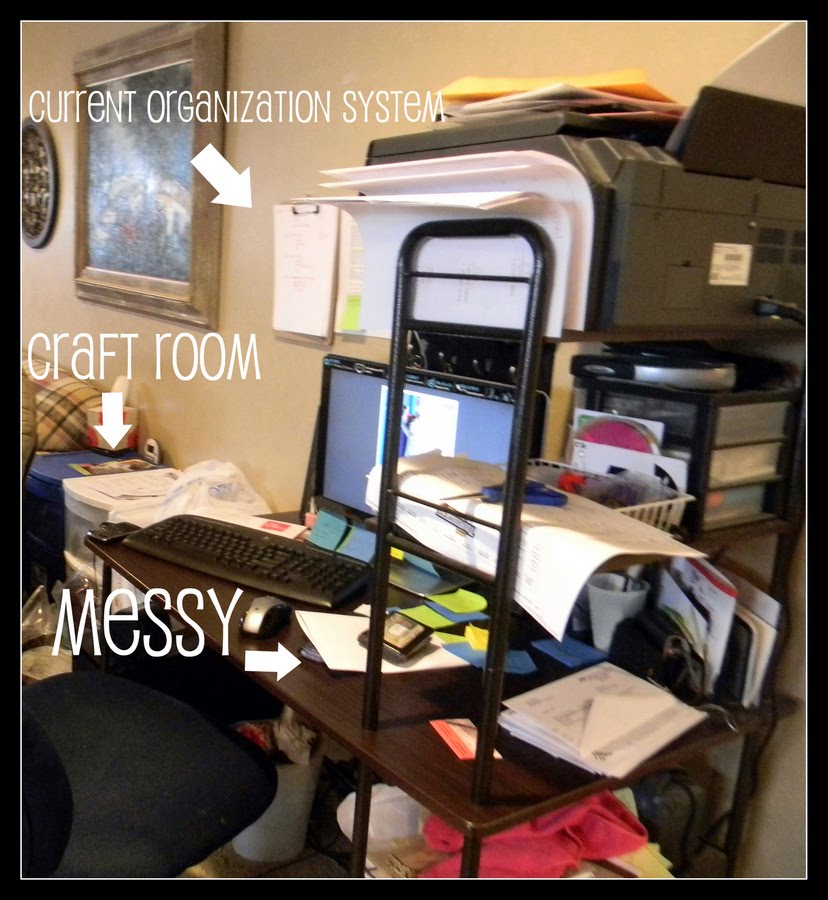
In the meantime, I had to come up with some kind of system to get myself better organized. So here is my current system...
Yes, that is a wall of clipboards...to be fair it's not an entire wall...just a piece of the wall. They are keeping me more organized though. I have one for the store, another for the blog, one of course is dedicated to my work over at Giverslog, and the last one is for my current orders that I'm working on. They work fine, but they are boring to look at, and I spend a lot of time looking at them, so I decided to make them a little more happy!

I got these clipboards at the Dollar Store, for a surprising price of a dollar (awesome price huh?),
after I stripped them of their paperwork I gathered up all my supplies for this project.
Some super cute scrapbook paper (12x12)
Mod Podge, a pencil and a spongy paint brush and I got to work.

You'll want to start off by cutting down your paper to just a little bit bigger than the clipboard.
After that, I put the paper on top of the clipboard and traced out where the clippy part of the board is like so
I cut that part out, so that my paper would slide right around it and have a snugger fit.

Now it's time to Mod Podge!
For this part I am generous with the Mod Podge, cover the clipboard pretty good and thick.
Slide your paper in place and you want to make sure it sticks really good! I use a scraper tool to do this. I actually use the one that came with my Silhouette, but if you don't have anything a credit card works just fine. You want to add firm pressure, but be careful not to rip the paper. I start from the middle and work my way to the edges (helps reduce bubbles). I go over it a few times, make sure to get a good firm seal on the edges. Fair warning this part does get a little messy so have a towel close by.
If your edges are longer you can Mod Podge the back side, glue them down and seal the edges like we did the front side like I did here.
And Voila!
You've got yourself a fancy little clipboard of your own!

At this point it's really a matter of preference whether you want to Mod Podge over the top or not. Some people don't like the way it looks, some do. If you do, it will give it a sheen finish, but you may see the streaks, and there is a possibility bubbling will become an issue especially if you are new to working with Mod Podge. I for this project decided that I wanted a more sheen look so I did go over the top.
When I go over the top I use just a little Mod Podge, I find this way I reduce the bubbling factor. It's kind of a trial and error process to figure out what works best for you.
After you cover the top set it aside to let it dry...it actually dries pretty fast a couple of hours and mine were good to go.
Here they are all finished up and fancy!
Here they are back in their rightful spot on the clipboard wall.
I know that my papers cover them up pretty good, but every now and then when I'm working I catch a little glimpse and they make me smile!
So go give them a try and happy crafting!!

blogger signature

Saturday, March 19, 2011

Organization Station-The Plan (Phase 1)-Living Room

So a few days ago I let you all in on my crazy addiction with organization...my secret shame if you will. So I thought today would be a good time to introduce you guys to "THE PLAN" and to give you a little back story on why I long for a more organized space.

So, first up is the back story:

Okay, so for those of you who don't know, we were living in Texas for the last 3 years but moved back to Utah about 10 months ago. My husband is currently finishing up his prerequisites for Pharmacy School, and working crazy hours and I am currently finishing up my Masters in Education.

Needless to say, money is tight, we are both in school, we are trying to pay off school debt and put some money away to one day finally be able to get into a house of our own and for the time being we are living with family in a basement apartment. The situation itself is not a bad deal really, our kids are building a great relationship with their grandparents, we are strengthening our financial situation for the future, I have help with my 4 little monkeys when I have class or an order I need to work on, and my husband's grandparents (who we are living with) have help around the house that they otherwise wouldn't have. So for right now it's a good deal all around.

Now, with that said, our basement apartment is great! It doesn't at all feel like a basement apartment. It has a ton of storage for the size of it, great natural light and big windows. We have our own kitchen, living room and we even have a toy room/play room for the kids. The only issue is that there are 6 of us living in 2 bedrooms, sharing 1 bathroom, and while there is a lot of storage we still seem to be bursting at the seams!! Luckily, the bedrooms and closets are huge, but with my hand in several projects, and with me being a super organizational NUT, not having a organized, dedicated space to work is DRIVING ME CRAZY!!! Not to mention that my stash of yarn is taking over!

Okay so I devised a plan that I am from here on out referring to as "THE PLAN" (super original huh??) I'm also kicking around the name "Operation Organization Station" or "Operation Stop the Crazy." The name is a work in progress, but for now it shall be known as "THE PLAN."
So my plan is to go one room at a time, come up with a organization solution that is low cost, easy to handle, but functional to what I need the room to be. I'm starting at one end of the apartment and moving my way down to the other end, and first up is the doozy...the Room of many functions...the Living Room/Office/Entertaining Area. So here is what I'm starting with:

This is our everything room (a.k.a living room), it is cluttered to the max! Our goal for this room was to cram as much junk into this room as humanly possible, and to make it function into as many functions as we could imagine...I'd say we succeeded! Yay, go us!

As you can see this space houses our TV, baby gear, office, work out center (didn't you see the Sweet Treadmill/Coat Rack?), and Craft room, to name a few. It is cluttered, and unorganized, and in every sense the word annoying. It is as unproductive as a space could be!!

AND I'm sick of it! It's a little difficult a space to work with because we are restricted on space and we do have to keep some pieces in here (i.e. the piano which isn't ours), buy fear not because I have a plan.

The Plan for this room consists of
1. rearranging furniture

2. purging unnecessary junk

3.organizing with some low cost (fingers crossed) solutions.

4. accessorizing/decorating just a touch for a more homey feel

The third part is the part that gets me all giddy! Believe me I have ideas for this, most are pretty standard, get some bins, drawers, clip boards...but what I'm really excited about is this:
Okay so, in my last post, I mentioned that I had a dream organization system from Pottery Barn. It really is a dream of mine, ( I have weird dreams). The only problem standing in the way of me and my dream is well Money. My dream system is pretty pricey over there at the Barn, and that is a problem...UNLESS you have the Bestest hubby in the whole world who is good with tools, and has a little experience in building things!

My wonderful hubby has agreed to lend his great building skills to help make one of my dreams come true! So I looked at all the different options that the Pottery Barn system has to offer, and tweaked them with what I needed for my office area and the picture below is my (sad), mock up drawing of the system that I want him to build for me!
My family is blessed with some great artistic ability and as you can see...that is a blessing that I was not given, and yes I know that the proportion is way off (or else I have some giant paperwork to file)...but hey the picture does the trick! He gets what I'm saying.

I am so excited to get started on this project and to FINALLY get some organization in to my space. I need it man! I'm telling you, I will be one happy lady once I get this first phase done. Stay tuned to follow my progress!

blogger signature